Mariama Ford
VTC (Virtual Time Capsule)
Mobile-first Web App
Figma + Custom Dev Collab
2024 - 6 months
Overview
Case Study
Overview
Virtual Time Capsule (VTC) lets people build digital time capsules — compilations of photos, videos, voice memos, and written memories — that are sealed and delivered to a chosen recipient at a future date. For the V2 redesign, I mapped and designed end-to-end experiences for four distinct user journeys: First-time and returning senders creating a capsule, contributors invited to add a memory, and recipients receiving and opening the final experience.
My Role:
Lead UX Researcher & Designer
Timeline:
June 2024 – November 2024
Deliverables:
User flow diagrams for 4 user types, hi-fi Figma prototypes, a tested end-to-end user story, contributor & recipient email touchpoints, plan/pricing structure
The Problem
The four user types already existed, but their experiences were disjointed. Each had grown somewhat independently, without a unified structure tying them together or a shared visual language connecting them. My job was to streamline that complexity: map out clear, intentional user journeys for each type so the process felt organized end-to-end, and build a cohesive design system so that a sender, a contributor, and a recipient would all recognize they were using the same product.
Discovery & Research
Building on feedback from prior user interviews, I identified and refined the four distinct user flows so the team could see at a glance where the journeys diverge and where they share screens:
- Sender, first-time (SF) — someone creating their very first capsule
- Sender, returning (SR) — someone coming back to an existing, in-progress capsule
- Contributor (C) — someone invited by a sender to add a single memory to someone else's capsule
- Recipient (R) — the person the finished capsule is ultimately delivered to
Flow Sf
·
Sender — First-time
User Journey Map
End-to-end path from landing page to delivered time capsule. Dashed nodes indicate optional steps.
Phase 01
Account Setup
User discovers and registers for the platform
Landing Page

Sign Up

Create Account

Verify Email

Onboarding
5 steps

Phase 02
Dashboard Entry
Personalize the experience and enter the product
Onboarding

Select Personalization

Empty-State Dashboard
3 steps

Phase 03
Create Time Capsule
Compose the capsule with video and optional collaborators
Create New Time Capsule

Record or Upload Video

optional
Add Contributors

optional
Set Recipient Privileges
4 steps

Phase 04
Recipient & Delivery
Designate the recipient, pay, and dispatch
Enter Recipient Information

Payment

Send Time Capsule
3 steps
Legend
Required step
Optional step

Flow direction

Phase transition
01 — Account Setup
02 — Dashboard Entry
03 — Create Time Capsule
04 — Recipient & Delivery
Flow SR
·
Sender — Returning
User Journey Map
Returning sender's path from log in through the dashboard to creating and sending a new time capsule. Dashed nodes indicate optional steps.
Phase 01
Log In
Returning sender arrives at the web app and authenticates
Web App Landing Page

Log In

Enter Credentials

Dashboard
4 steps

Phase 02
Dashboard Navigation
Hub of primary actions available from the main dashboard
Dashboard

Create New Time Capsule
View / Manage Sent Time Capsules
View / Manage Received Time Capsules
View / Manage Profile Details

Phase 03
Create Time Capsule
Two paths from the dashboard: record a new video or upload an existing one
Record
7 steps
Create New Time Capsule

Record New Time Capsule

Choose a Prompt

Record Video

optional
Add Contributors

Fill Out Recipient Information

Send Time Capsule
Upload
6 steps
Create New Time Capsule

Upload Time Capsule

Upload Video

optional
Add Contributors

Fill Out Recipient Information

Send Time Capsule
Legend
Required step
Optional step
Navigation hub

Flow direction

Phase transition
01 — Log In
02 — Dashboard Navigation
03 — Create Time Capsule
Flow R
·
Recipient
User Journey Map
Recipient's path from receiving a capsule through optional account creation and capsule management. Dashed nodes indicate optional steps.
Phase 01
Receive & View Time Capsule
Recipient opens their capsule and optionally decides to create their own
Receive Time Capsule

View Received Time Capsule

optional
Select "Create Your Own"
3 steps

Phase 02
Account Setup
Prompted to register and verify identity
Redirect to Sign Up

Sign Up

Create Account

Verify Account by Email

Redirect to Onboarding
5 steps

Phase 03
Dashboard Entry
Complete onboarding and arrive at the main dashboard
Complete Personalization Questions

Dashboard
2 steps

Phase 04
Dashboard Navigation
Hub of primary actions available from the dashboard
Dashboard

Create New Time Capsule
View / Manage Sent Time Capsules
View / Manage Received Time Capsules
View / Manage Profile Details

Phase 05
Create Time Capsule
Two paths from the dashboard: record a new video or upload an existing one
Record
7 steps
Create New Time Capsule

Record New Time Capsule

Choose a Prompt

Record Video

optional
Add Contributors

Fill Out Recipient Information

Send Time Capsule
Upload
6 steps
Create New Time Capsule

Upload Time Capsule

Upload Video

optional
Add Contributors

Fill Out Recipient Information

Send Time Capsule
Legend
Required step
Optional step
Navigation hub

Flow direction

Phase transition
01 — Receive & View Time Capsule
02 — Account Setup
03 — Dashboard Entry
04 — Dashboard Navigation
05 — Create Time Capsule
Flow C
·
Contributor
User Journey Map
Contributor's path from receiving an invitation through adding their contribution and optionally managing their own capsules. Dashed nodes indicate optional steps.
Phase 01
Receive Contribution Invitation
Contributor receives an invite and opts in to contribute
Receive Invitation to Contribute to Time Capsule

Select "Sign Up to Contribute"
2 steps

Phase 02
Account Setup
Register and verify identity to access the platform
Create Account

Verify Account by Email

Redirect to Onboarding
3 steps

Phase 03
Contributor Onboarding
Personalize the experience and land on contribution requests
Complete Personalization Questions

Redirect to Time Capsule Requests
2 steps

Phase 04
Contribute to Time Capsule
Open the assigned request and submit a contribution
Open Assigned Time Capsule Request

Add Contribution to Requested Time Capsule
2 steps

Phase 05
Complete Contribution & Dashboard Entry
Finish the contribution, optionally start their own, then reach the dashboard
Finish Contribution

Select "Create Your Own"

Dashboard
3 steps

Phase 06
Dashboard Navigation
Hub of primary actions available from the main dashboard
Dashboard

Create New Time Capsule
View / Manage Sent Time Capsules
View / Manage Received Time Capsules
View / Manage Profile Details

Phase 07
Create Time Capsule
Two paths from the dashboard: record a new video or upload an existing one
Record
7 steps
Create New Time Capsule

Record New Time Capsule

Choose a Prompt

Record Video

optional
Add Contributors

Fill Out Recipient Information

Send Time Capsule
Upload
6 steps
Create New Time Capsule

Upload Time Capsule

Upload Video

optional
Add Contributors

Fill Out Recipient Information

Send Time Capsule
Legend
Required step
Optional step
Navigation hub

Flow direction

Phase transition
01 — Receive Contribution Invitation
02 — Account Setup
03 — Contributor Onboarding
04 — Contribute to Time Capsule
05 — Complete Contribution & Dashboard Entry
06 — Dashboard Navigation
07 — Create Time Capsule
^ Four mapped user flows: Sender (First-Time), Sender (Returning), Recipient, and Contributor.
Mapping the Four Flows
- First-Time Sender Flow
- Create account, verify email
- Complete profile — photo, relationship to the capsule, age range, how they heard about VTC
- Identify what they connect with most (Family Historian, Grandparent, New Parent, Legacy-Maker, etc.) and how they plan to use VTC Milestones
- Choose a plan:
- Start a capsule from a guided template or a blank canvas
- Select up to 10 memory prompts, or write a custom one
- Add memories to each prompt as text, photo, video, or voice recording
- Invite up to 4 contributors by email, previewing exactly what their invite will look like before sending
- Send the capsule
- Returning Sender Flow
- Open an existing, in-progress capsule (e.g., “Loving Lila”) directly from the dashboard
- See real-time storage and time usage against the plan (photos and video minutes used vs. available)
- Keep adding memories to existing prompts, or add new ones
- Contributor Flow
- Receive an email invite from the sender, naming the specific memory they're being asked about
- Create an account (if new) and verify email
- Complete a short profile — relationship to the sender, age range, how they heard about VTC
- Land directly in a dedicated thread for that one memory prompt, which auto-closes in 30 days
- Record a voice memo, type a response, or attach a photo
- Get confirmation the contribution was added, with an invitation to identify what they connect with most and start a capsule of their own

^ Contributor flow: invite → account creation → dedicated memory thread → confirmation.
- Recipient Flow
- Receive an “Evite”-style email announcing the capsule and who it's from
- Sign in or create an account to unlock and view the full capsule
- Land on a reveal screen (“Replay”) showing the capsule and the date it remains available until
- Rate the experience and get prompted to create a capsule of their own
Design System
The VTC brand pairs a deep navy with soft sky-blue gradients, anchored by a cloud, lock, and video camera mark that ties together the ideas of safekeeping and memory capture. That palette carried through every touchpoint — account creation, capsule building, and plan selection —, so the experience feels consistent whether someone is a first-time sender or a one-time contributor.
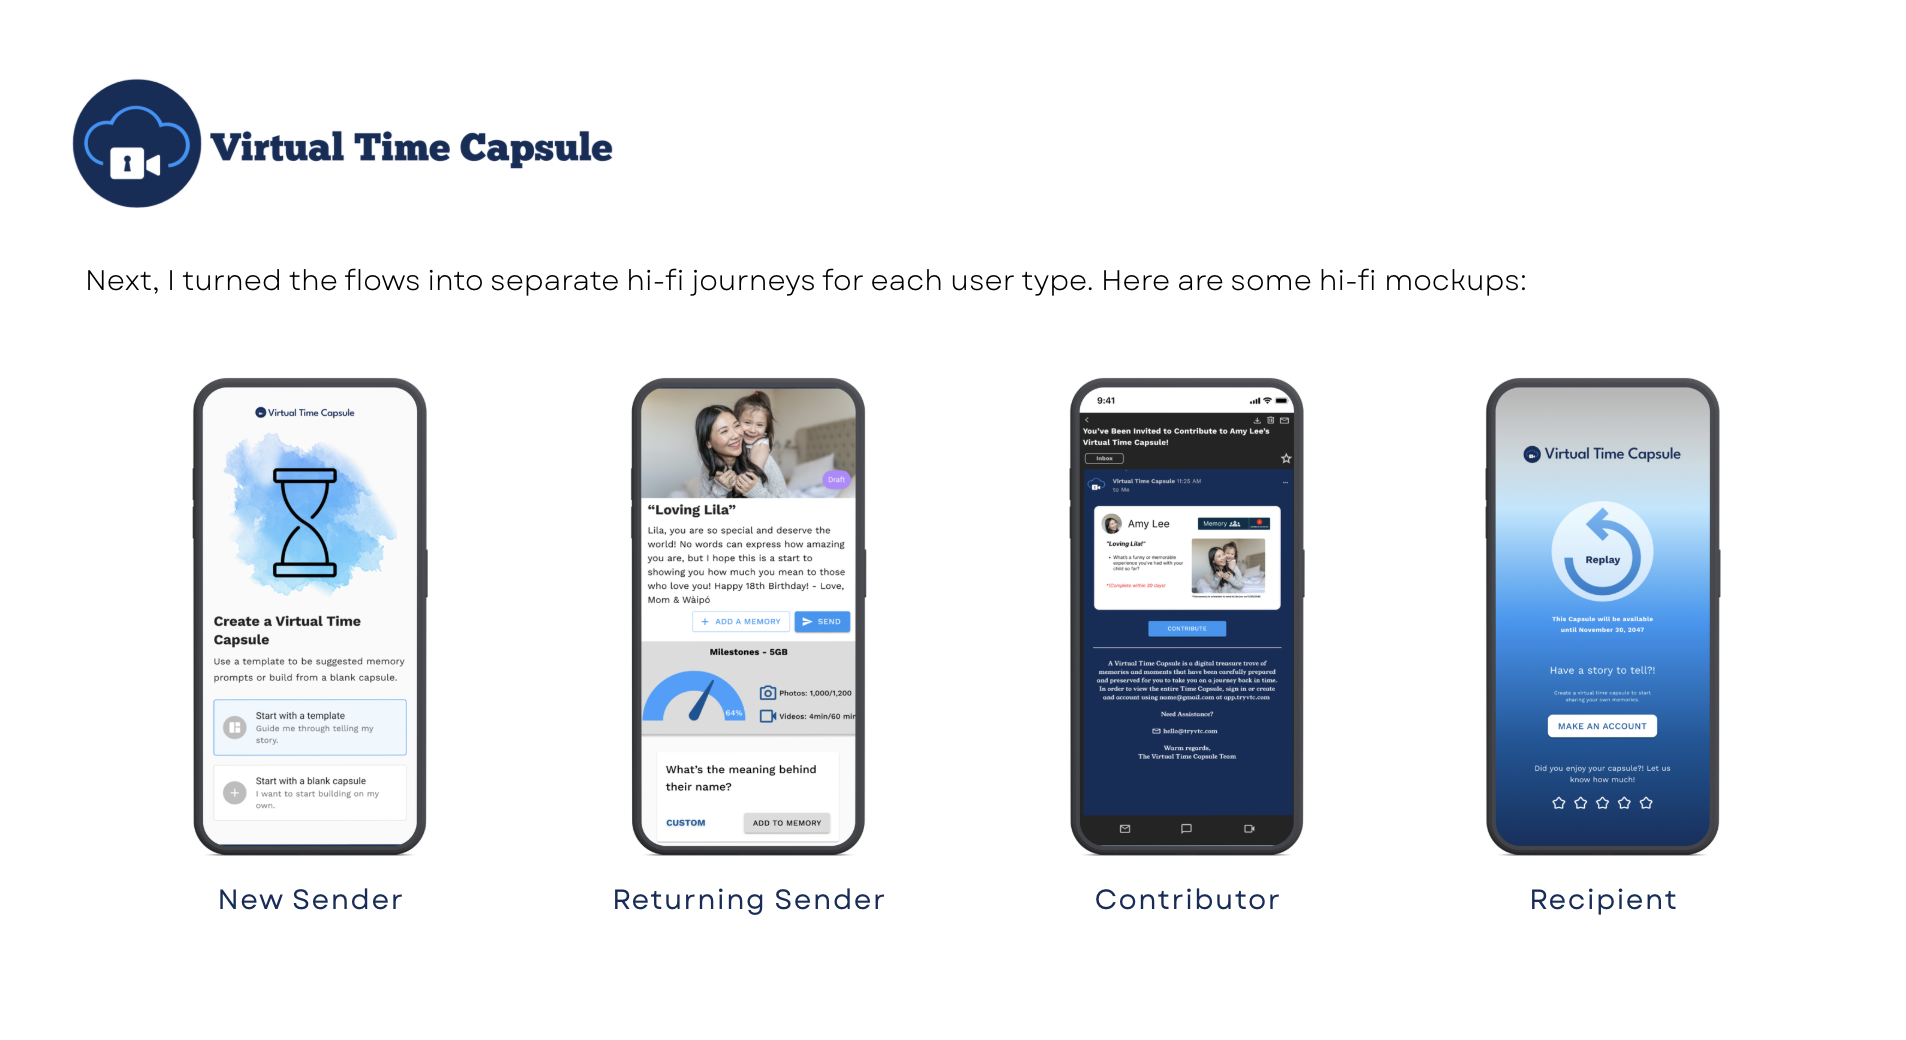
^ Hi-fi journeys for each of the four user types: New Sender, Returning Sender, Contributor, and Recipient.
Prototyping
High-fidelity prototypes were built in Figma for all four user types, covering account creation, profile setup, plan selection, capsule building, and delivery. Several variations were explored for how a single memory could be captured — straight-to-camera video, a narrated photo, or a simple audio recording, so senders and contributors could choose whatever felt most natural for that memory.
^ The full Recipient experience from capsule receipt to account creation
Testing the Flow
End-to-End
To pressure-test the system as a whole, I ran the design against a single, concrete scenario: Amy Lee creates a capsule for her daughter Lila's 18th birthday. The capsule spans 2024 to 2042 and is set to deliver in 2042. Amy invites her mother, Margaret Chen (Lila's grandmother), to contribute memories in 2024, 2034, and 2042. In 2042, Lila (by then a young adult headed off to college) receives the capsule, with her grandmother's contributions included.
User Story
Amy Lee creates a time capsule for her daughter's 18th birthday
Amy Lee creates a capsule for her daughter, Lila's, 18th birthday. The capsule spans from 2024 to 2042 and will be delivered in 2042.
Amy sends a contributor request to her mother — Lila's grandma, Margaret Chen — for memories in 2024, 2034, and 2042.
Lila Lee receives the capsule in 2042, now a new mom to her own daughter, with grandma Margaret as a contributor.
2024
Capsule created
2034
Contributions added
2042
Capsule delivered
Capsule Photos
5 memories
Amy Lee
Sender
Margaret Chen
Contributor
Lila Lee
Recipient











^ The Amy Lee → Margaret Chen → Lila Lee scenario used to test the sender, contributor, and recipient flows together.
Challenges
Designing four flows that needed to feel like one product was the central challenge. A sender, a contributor invited for thirty days, and a recipient opening a capsule decades later all needed to recognize VTC immediately, despite very different contexts and stakes. A second challenge was designing for moments that happen outside the app entirely: Both the contributor invite and the recipient invite are email-first experiences, which meant the visual and verbal tone had to read clearly in an inbox, not just in-product.
Outcome
The V2 redesign delivered mapped, diagrammed flows for all four user types, hi-fi Figma prototypes covering account creation through capsule delivery, and a tested end-to-end scenario that validated the experience across collaboration and the recipient's eventual reveal. All designs were prepared for implementation and marked as “Ready for Dev,” creating a seamless handoff to the development team. My designs were ultimately integrated into the web app, which are still apparent.
Let’s work together.
mariamaford.com
GET IN TOUCH

Previous
Next

VTC (Virtual Time Capsule)
Mobile-first Web App
Figma + Custom Dev Collab
2024 - 6 months
Overview
Case Study
Overview
Virtual Time Capsule (VTC) lets people build digital time capsules — compilations of photos, videos, voice memos, and written memories — that are sealed and delivered to a chosen recipient at a future date. For the V2 redesign, I mapped and designed end-to-end experiences for four distinct user journeys: First-time and returning senders creating a capsule, contributors invited to add a memory, and recipients receiving and opening the final experience.
My Role: Lead UX Researcher & Designer
Timeline: June 2024 – November 2024
Deliverables: User flow diagrams for 4 user types, hi-fi Figma prototypes, a tested end-to-end user story, contributor & recipient email touchpoints, plan/pricing structure
The Problem
The four user types already existed, but their experiences were disjointed. Each had grown somewhat independently, without a unified structure tying them together or a shared visual language connecting them. My job was to streamline that complexity: map out clear, intentional user journeys for each type so the process felt organized end-to-end, and build a cohesive design system so that a sender, a contributor, and a recipient would all recognize they were using the same product.
Discovery & Research
Building on feedback from prior user interviews, I identified and refined the four distinct user flows so the team could see at a glance where the journeys diverge and where they share screens:
- Sender, first-time (SF) — someone creating their very first capsule
- Sender, returning (SR) — someone coming back to an existing, in-progress capsule
- Contributor (C) — someone invited by a sender to add a single memory to someone else's capsule
- Recipient (R) — the person the finished capsule is ultimately delivered to
Flow Sf
·
Sender — First-time
User Journey Map
End-to-end path from landing page to delivered time capsule. Dashed nodes indicate optional steps.
Phase 01
Account Setup
User discovers and registers for the platform
Landing Page
Sign Up
Create Account
Verify Email
Onboarding
5 steps
Phase 02
Dashboard Entry
Personalize the experience and enter the product
Onboarding
Select Personalization
Empty-State Dashboard
3 steps
Phase 03
Create Time Capsule
Compose the capsule with video and optional collaborators
Create New Time Capsule
Record or Upload Video
optional
Add Contributors
optional
Set Recipient Privileges
4 steps
Phase 04
Recipient & Delivery
Designate the recipient, pay, and dispatch
Enter Recipient Information
Payment
Send Time Capsule
3 steps
Legend
Required step
Optional step
Flow direction
Phase transition
01 — Account Setup
02 — Dashboard Entry
03 — Create Time Capsule
04 — Recipient & Delivery
Flow SR
·
Sender — Returning
User Journey Map
Returning sender's path from log in through the dashboard to creating and sending a new time capsule. Dashed nodes indicate optional steps.
Phase 01
Log In
Returning sender arrives at the web app and authenticates
Web App Landing Page
Log In
Enter Credentials
Dashboard
4 steps
Phase 02
Dashboard Navigation
Hub of primary actions available from the main dashboard
Dashboard
Create New Time Capsule
View / Manage Sent Time Capsules
View / Manage Received Time Capsules
View / Manage Profile Details
Phase 03
Create Time Capsule
Two paths from the dashboard: record a new video or upload an existing one
Record
7 steps
Create New Time Capsule
Record New Time Capsule
Choose a Prompt
Record Video
optional
Add Contributors
Fill Out Recipient Information
Send Time Capsule
Upload
6 steps
Create New Time Capsule
Upload Time Capsule
Upload Video
optional
Add Contributors
Fill Out Recipient Information
Send Time Capsule
Legend
Required step
Optional step
Navigation hub
Flow direction
Phase transition
01 — Log In
02 — Dashboard Navigation
03 — Create Time Capsule
Flow R
·
Recipient
User Journey Map
Recipient's path from receiving a capsule through optional account creation and capsule management. Dashed nodes indicate optional steps.
Phase 01
Receive & View Time Capsule
Recipient opens their capsule and optionally decides to create their own
Receive Time Capsule
View Received Time Capsule
optional
Select "Create Your Own"
3 steps
Phase 02
Account Setup
Prompted to register and verify identity
Redirect to Sign Up
Sign Up
Create Account
Verify Account by Email
Redirect to Onboarding
5 steps
Phase 03
Dashboard Entry
Complete onboarding and arrive at the main dashboard
Complete Personalization Questions
Dashboard
2 steps
Phase 04
Dashboard Navigation
Hub of primary actions available from the dashboard
Dashboard
Create New Time Capsule
View / Manage Sent Time Capsules
View / Manage Received Time Capsules
View / Manage Profile Details
Phase 05
Create Time Capsule
Two paths from the dashboard: record a new video or upload an existing one
Record
7 steps
Create New Time Capsule
Record New Time Capsule
Choose a Prompt
Record Video
optional
Add Contributors
Fill Out Recipient Information
Send Time Capsule
Upload
6 steps
Create New Time Capsule
Upload Time Capsule
Upload Video
optional
Add Contributors
Fill Out Recipient Information
Send Time Capsule
Legend
Required step
Optional step
Navigation hub
Flow direction
Phase transition
01 — Receive & View Time Capsule
02 — Account Setup
03 — Dashboard Entry
04 — Dashboard Navigation
05 — Create Time Capsule
Flow C
·
Contributor
User Journey Map
Contributor's path from receiving an invitation through adding their contribution and optionally managing their own capsules. Dashed nodes indicate optional steps.
Phase 01
Receive Contribution Invitation
Contributor receives an invite and opts in to contribute
Receive Invitation to Contribute to Time Capsule
Select "Sign Up to Contribute"
2 steps
Phase 02
Account Setup
Register and verify identity to access the platform
Create Account
Verify Account by Email
Redirect to Onboarding
3 steps
Phase 03
Contributor Onboarding
Personalize the experience and land on contribution requests
Complete Personalization Questions
Redirect to Time Capsule Requests
2 steps
Phase 04
Contribute to Time Capsule
Open the assigned request and submit a contribution
Open Assigned Time Capsule Request
Add Contribution to Requested Time Capsule
2 steps
Phase 05
Complete Contribution & Dashboard Entry
Finish the contribution, optionally start their own, then reach the dashboard
Finish Contribution
Select "Create Your Own"
Dashboard
3 steps
Phase 06
Dashboard Navigation
Hub of primary actions available from the main dashboard
Dashboard
Create New Time Capsule
View / Manage Sent Time Capsules
View / Manage Received Time Capsules
View / Manage Profile Details
Phase 07
Create Time Capsule
Two paths from the dashboard: record a new video or upload an existing one
Record
7 steps
Create New Time Capsule
Record New Time Capsule
Choose a Prompt
Record Video
optional
Add Contributors
Fill Out Recipient Information
Send Time Capsule
Upload
6 steps
Create New Time Capsule
Upload Time Capsule
Upload Video
optional
Add Contributors
Fill Out Recipient Information
Send Time Capsule
Legend
Required step
Optional step
Navigation hub
Flow direction
Phase transition
01 — Receive Contribution Invitation
02 — Account Setup
03 — Contributor Onboarding
04 — Contribute to Time Capsule
05 — Complete Contribution & Dashboard Entry
06 — Dashboard Navigation
07 — Create Time Capsule
^ Four mapped user flows: Sender (First-Time), Sender (Returning), Recipient, and Contributor.
Mapping the Four Flows
- First-Time Sender Flow
- Create account, verify email
- Complete profile — photo, relationship to the capsule, age range, how they heard about VTC
- Identify what they connect with most (Family Historian, Grandparent, New Parent, Legacy-Maker, etc.) and how they plan to use VTC Milestones
- Choose a plan:
- Start a capsule from a guided template or a blank canvas
- Select up to 10 memory prompts, or write a custom one
- Add memories to each prompt as text, photo, video, or voice recording
- Invite up to 4 contributors by email, previewing exactly what their invite will look like before sending
- Send the capsule
- Returning Sender Flow
- Open an existing, in-progress capsule (e.g., “Loving Lila”) directly from the dashboard
- See real-time storage and time usage against the plan (photos and video minutes used vs. available)
- Keep adding memories to existing prompts, or add new ones
- Contributor Flow
- Receive an email invite from the sender, naming the specific memory they're being asked about
- Create an account (if new) and verify email
- Complete a short profile — relationship to the sender, age range, how they heard about VTC
- Land directly in a dedicated thread for that one memory prompt, which auto-closes in 30 days
- Record a voice memo, type a response, or attach a photo
- Get confirmation the contribution was added, with an invitation to identify what they connect with most and start a capsule of their own
^ Contributor flow: invite → account creation → dedicated memory thread → confirmation.
- Recipient Flow
- Receive an “Evite”-style email announcing the capsule and who it's from
- Sign in or create an account to unlock and view the full capsule
- Land on a reveal screen (“Replay”) showing the capsule and the date it remains available until
- Rate the experience and get prompted to create a capsule of their own
Design System
The VTC brand pairs a deep navy with soft sky-blue gradients, anchored by a cloud, lock, and video camera mark that ties together the ideas of safekeeping and memory capture. That palette carried through every touchpoint — account creation, capsule building, and plan selection —, so the experience feels consistent whether someone is a first-time sender or a one-time contributor.
^ Hi-fi journeys for each of the four user types: New Sender, Returning Sender, Contributor, and Recipient.
Prototyping
High-fidelity prototypes were built in Figma for all four user types, covering account creation, profile setup, plan selection, capsule building, and delivery. Several variations were explored for how a single memory could be captured — straight-to-camera video, a narrated photo, or a simple audio recording, so senders and contributors could choose whatever felt most natural for that memory.
^ The full Recipient experience from capsule receipt to account creation
Testing the Flow End-to-End
To pressure-test the system as a whole, I ran the design against a single, concrete scenario: Amy Lee creates a capsule for her daughter Lila's 18th birthday. The capsule spans 2024 to 2042 and is set to deliver in 2042. Amy invites her mother, Margaret Chen (Lila's grandmother), to contribute memories in 2024, 2034, and 2042. In 2042, Lila (by then a young adult headed off to college) receives the capsule, with her grandmother's contributions included.
User Story
Amy Lee creates a time capsule for her daughter's 18th birthday
Amy Lee creates a capsule for her daughter, Lila's, 18th birthday. The capsule spans from 2024 to 2042 and will be delivered in 2042.
Amy sends a contributor request to her mother — Lila's grandma, Margaret Chen — for memories in 2024, 2034, and 2042.
Lila Lee receives the capsule in 2042, now a new mom to her own daughter, with grandma Margaret as a contributor.
2024
Capsule created
2034
Contributions added
2042
Capsule delivered
Capsule Photos
5 memories
Amy Lee
Sender
Margaret Chen
Contributor
Lila Lee
Recipient
^ The Amy Lee → Margaret Chen → Lila Lee scenario used to test the sender, contributor, and recipient flows together.
Challenges
Designing four flows that needed to feel like one product was the central challenge. A sender, a contributor invited for thirty days, and a recipient opening a capsule decades later all needed to recognize VTC immediately, despite very different contexts and stakes. A second challenge was designing for moments that happen outside the app entirely: Both the contributor invite and the recipient invite are email-first experiences, which meant the visual and verbal tone had to read clearly in an inbox, not just in-product.
Outcome
The V2 redesign delivered mapped, diagrammed flows for all four user types, hi-fi Figma prototypes covering account creation through capsule delivery, and a tested end-to-end scenario that validated the experience across collaboration and the recipient's eventual reveal. All designs were prepared for implementation and marked as “Ready for Dev,” creating a seamless handoff to the development team. My designs were ultimately integrated into the web app, which are still apparent.
Previous
Next
VTC (Virtual Time Capsule)
Mobile-first Web App
Figma + Custom Dev Collab
2024 - 6 months
Overview
Virtual Time Capsule (VTC) lets people build digital time capsules — compilations of photos, videos, voice memos, and written memories — that are sealed and delivered to a chosen recipient at a future date. For the V2 redesign, I mapped and designed end-to-end experiences for four distinct user journeys: First-time and returning senders creating a capsule, contributors invited to add a memory, and recipients receiving and opening the final experience.
My Role: Lead UX Researcher & Designer
Timeline: June 2024 – November 2024
Deliverables: User flow diagrams for 4 user types, hi-fi Figma prototypes, a tested end-to-end user story, contributor & recipient email touchpoints, plan/pricing structure
The Problem
The four user types already existed, but their experiences were disjointed. Each had grown somewhat independently, without a unified structure tying them together or a shared visual language connecting them. My job was to streamline that complexity: map out clear, intentional user journeys for each type so the process felt organized end-to-end, and build a cohesive design system so that a sender, a contributor, and a recipient would all recognize they were using the same product.
Discovery & Research
Building on feedback from prior user interviews, I identified and refined the four distinct user flows so the team could see at a glance where the journeys diverge and where they share screens:
- Sender, first-time (SF) — someone creating their very first capsule
- Sender, returning (SR) — someone coming back to an existing, in-progress capsule
- Contributor (C) — someone invited by a sender to add a single memory to someone else's capsule
- Recipient (R) — the person the finished capsule is ultimately delivered to
Flow Sf
·
Sender — First-time
User Journey Map
End-to-end path from landing page to delivered time capsule. Dashed nodes indicate optional steps.
Phase 01
Account Setup
User discovers and registers for the platform
Landing Page
Sign Up
Create Account
Verify Email
Onboarding
5 steps
Phase 02
Dashboard Entry
Personalize the experience and enter the product
Onboarding
Select Personalization
Empty-State Dashboard
3 steps
Phase 03
Create Time Capsule
Compose the capsule with video and optional collaborators
Create New Time Capsule
Record or Upload Video
optional
Add Contributors
optional
Set Recipient Privileges
4 steps
Phase 04
Recipient & Delivery
Designate the recipient, pay, and dispatch
Enter Recipient Information
Payment
Send Time Capsule
3 steps
Legend
Required step
Optional step
Flow direction
Phase transition
01 — Account Setup
02 — Dashboard Entry
03 — Create Time Capsule
04 — Recipient & Delivery
Flow SR
·
Sender — Returning
User Journey Map
Returning sender's path from log in through the dashboard to creating and sending a new time capsule. Dashed nodes indicate optional steps.
Phase 01
Log In
Returning sender arrives at the web app and authenticates
Web App Landing Page
Log In
Enter Credentials
Dashboard
4 steps
Phase 02
Dashboard Navigation
Hub of primary actions available from the main dashboard
Dashboard
Create New Time Capsule
View / Manage Sent Time Capsules
View / Manage Received Time Capsules
View / Manage Profile Details
Phase 03
Create Time Capsule
Two paths from the dashboard: record a new video or upload an existing one
Record
7 steps
Create New Time Capsule
Record New Time Capsule
Choose a Prompt
Record Video
optional
Add Contributors
Fill Out Recipient Information
Send Time Capsule
Upload
6 steps
Create New Time Capsule
Upload Time Capsule
Upload Video
optional
Add Contributors
Fill Out Recipient Information
Send Time Capsule
Legend
Required step
Optional step
Navigation hub
Flow direction
Phase transition
01 — Log In
02 — Dashboard Navigation
03 — Create Time Capsule
Flow R
·
Recipient
User Journey Map
Recipient's path from receiving a capsule through optional account creation and capsule management. Dashed nodes indicate optional steps.
Phase 01
Receive & View Time Capsule
Recipient opens their capsule and optionally decides to create their own
Receive Time Capsule
View Received Time Capsule
optional
Select "Create Your Own"
3 steps
Phase 02
Account Setup
Prompted to register and verify identity
Redirect to Sign Up
Sign Up
Create Account
Verify Account by Email
Redirect to Onboarding
5 steps
Phase 03
Dashboard Entry
Complete onboarding and arrive at the main dashboard
Complete Personalization Questions
Dashboard
2 steps
Phase 04
Dashboard Navigation
Hub of primary actions available from the dashboard
Dashboard
Create New Time Capsule
View / Manage Sent Time Capsules
View / Manage Received Time Capsules
View / Manage Profile Details
Phase 05
Create Time Capsule
Two paths from the dashboard: record a new video or upload an existing one
Record
7 steps
Create New Time Capsule
Record New Time Capsule
Choose a Prompt
Record Video
optional
Add Contributors
Fill Out Recipient Information
Send Time Capsule
Upload
6 steps
Create New Time Capsule
Upload Time Capsule
Upload Video
optional
Add Contributors
Fill Out Recipient Information
Send Time Capsule
Legend
Required step
Optional step
Navigation hub
Flow direction
Phase transition
01 — Receive & View Time Capsule
02 — Account Setup
03 — Dashboard Entry
04 — Dashboard Navigation
05 — Create Time Capsule
Flow C
·
Contributor
User Journey Map
Contributor's path from receiving an invitation through adding their contribution and optionally managing their own capsules. Dashed nodes indicate optional steps.
Phase 01
Receive Contribution Invitation
Contributor receives an invite and opts in to contribute
Receive Invitation to Contribute to Time Capsule
Select "Sign Up to Contribute"
2 steps
Phase 02
Account Setup
Register and verify identity to access the platform
Create Account
Verify Account by Email
Redirect to Onboarding
3 steps
Phase 03
Contributor Onboarding
Personalize the experience and land on contribution requests
Complete Personalization Questions
Redirect to Time Capsule Requests
2 steps
Phase 04
Contribute to Time Capsule
Open the assigned request and submit a contribution
Open Assigned Time Capsule Request
Add Contribution to Requested Time Capsule
2 steps
Phase 05
Complete Contribution & Dashboard Entry
Finish the contribution, optionally start their own, then reach the dashboard
Finish Contribution
Select "Create Your Own"
Dashboard
3 steps
Phase 06
Dashboard Navigation
Hub of primary actions available from the main dashboard
Dashboard
Create New Time Capsule
View / Manage Sent Time Capsules
View / Manage Received Time Capsules
View / Manage Profile Details
Phase 07
Create Time Capsule
Two paths from the dashboard: record a new video or upload an existing one
Record
7 steps
Create New Time Capsule
Record New Time Capsule
Choose a Prompt
Record Video
optional
Add Contributors
Fill Out Recipient Information
Send Time Capsule
Upload
6 steps
Create New Time Capsule
Upload Time Capsule
Upload Video
optional
Add Contributors
Fill Out Recipient Information
Send Time Capsule
Legend
Required step
Optional step
Navigation hub
Flow direction
Phase transition
01 — Receive Contribution Invitation
02 — Account Setup
03 — Contributor Onboarding
04 — Contribute to Time Capsule
05 — Complete Contribution & Dashboard Entry
06 — Dashboard Navigation
07 — Create Time Capsule
^ Four mapped user flows: Sender (First-Time), Sender (Returning), Recipient, and Contributor.
Mapping the Four Flows
- First-Time Sender Flow
- Create account, verify email
- Complete profile — photo, relationship to the capsule, age range, how they heard about VTC
- Identify what they connect with most (Family Historian, Grandparent, New Parent, Legacy-Maker, etc.) and how they plan to use VTC Milestones
- Choose a plan:
- Start a capsule from a guided template or a blank canvas
- Select up to 10 memory prompts, or write a custom one
- Add memories to each prompt as text, photo, video, or voice recording
- Invite up to 4 contributors by email, previewing exactly what their invite will look like before sending
- Send the capsule
- Returning Sender Flow
- Open an existing, in-progress capsule (e.g., “Loving Lila”) directly from the dashboard
- See real-time storage and time usage against the plan (photos and video minutes used vs. available)
- Keep adding memories to existing prompts, or add new ones
- Contributor Flow
- Receive an email invite from the sender, naming the specific memory they're being asked about
- Create an account (if new) and verify email
- Complete a short profile — relationship to the sender, age range, how they heard about VTC
- Land directly in a dedicated thread for that one memory prompt, which auto-closes in 30 days
- Record a voice memo, type a response, or attach a photo
- Get confirmation the contribution was added, with an invitation to identify what they connect with most and start a capsule of their own
^ Contributor flow: invite → account creation → dedicated memory thread → confirmation.
- Recipient Flow
- Receive an “Evite”-style email announcing the capsule and who it's from
- Sign in or create an account to unlock and view the full capsule
- Land on a reveal screen (“Replay”) showing the capsule and the date it remains available until
- Rate the experience and get prompted to create a capsule of their own
Design System
The VTC brand pairs a deep navy with soft sky-blue gradients, anchored by a cloud, lock, and video camera mark that ties together the ideas of safekeeping and memory capture. That palette carried through every touchpoint — account creation, capsule building, and plan selection —, so the experience feels consistent whether someone is a first-time sender or a one-time contributor.
^ Hi-fi journeys for each of the four user types: New Sender, Returning Sender, Contributor, and Recipient.
Prototyping
High-fidelity prototypes were built in Figma for all four user types, covering account creation, profile setup, plan selection, capsule building, and delivery. Several variations were explored for how a single memory could be captured — straight-to-camera video, a narrated photo, or a simple audio recording, so senders and contributors could choose whatever felt most natural for that memory.
^ The full Recipient experience from capsule receipt to account creation
Testing the Flow End-to-End
To pressure-test the system as a whole, I ran the design against a single, concrete scenario: Amy Lee creates a capsule for her daughter Lila's 18th birthday. The capsule spans 2024 to 2042 and is set to deliver in 2042. Amy invites her mother, Margaret Chen (Lila's grandmother), to contribute memories in 2024, 2034, and 2042. In 2042, Lila (by then a young adult headed off to college) receives the capsule, with her grandmother's contributions included.
User Story
Amy Lee creates a time capsule for her daughter's 18th birthday
Amy Lee creates a capsule for her daughter, Lila's, 18th birthday. The capsule spans from 2024 to 2042 and will be delivered in 2042.
Amy sends a contributor request to her mother — Lila's grandma, Margaret Chen — for memories in 2024, 2034, and 2042.
Lila Lee receives the capsule in 2042, now a new mom to her own daughter, with grandma Margaret as a contributor.
2024
Capsule created
2034
Contributions added
2042
Capsule delivered
Capsule Photos
5 memories
Amy Lee
Sender
Margaret Chen
Contributor
Lila Lee
Recipient
^ The Amy Lee → Margaret Chen → Lila Lee scenario used to test the sender, contributor, and recipient flows together.
Challenges
Designing four flows that needed to feel like one product was the central challenge. A sender, a contributor invited for thirty days, and a recipient opening a capsule decades later all needed to recognize VTC immediately, despite very different contexts and stakes. A second challenge was designing for moments that happen outside the app entirely: Both the contributor invite and the recipient invite are email-first experiences, which meant the visual and verbal tone had to read clearly in an inbox, not just in-product.
Outcome
The V2 redesign delivered mapped, diagrammed flows for all four user types, hi-fi Figma prototypes covering account creation through capsule delivery, and a tested end-to-end scenario that validated the experience across collaboration and the recipient's eventual reveal. All designs were prepared for implementation and marked as “Ready for Dev,” creating a seamless handoff to the development team. My designs were ultimately integrated into the web app, which are still apparent.
Next
Previous